#Reset Netgear WiFi Extender Setup
Explore tagged Tumblr posts
Visit Tumblr Blog
Explore Tumblr blogs with no restrictions, modern design and the best experience.
Last Seen Tumblr Blogs


Fun Fact
Tumblr has a 66 index score for customer satisfaction in the US.
Text
A Guide 2024 on How to Reset Netgear WiFi Extender

Method 1: Soft Reset via Web Interface

Connect to the Extender:
Ensure your device is connected to the Netgear WiFi extender network.
Open a web browser and enter the default web address “http://mywifiext.net" in the address bar.
Log In:
Enter your admin credentials (username and password) to access the extender’s web interface.
Navigate to Reset:
Locate and click on the “Settings” or “Maintenance” option.
Find the “Reset” or “Restore Factory Settings” option.
Confirm Reset:
Follow the on-screen instructions to confirm the reset.
Allow the extender to reboot, and it will be reset to its default settings.
Method 2: Hard Reset Using the Reset Button
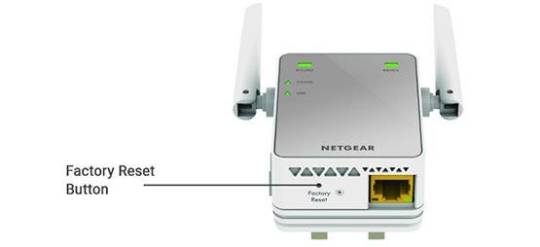
Locate the Reset Button:
On your Netgear WiFi extender, find the reset button. It is usually a small hole labeled “Reset.”
Use a Paperclip or Pin:
With the extender powered on, use a paperclip or pin to press and hold the reset button for about 10 seconds.
Release the Button:
Release the button when the LED lights on the extender start flashing.
The extender will reset to its factory settings.
Method 3: Factory Reset Using Netgear Genie App
Install Netgear Genie:
Download and install the Netgear Genie app on your smartphone or computer.
Launch the App:
Open the Netgear Genie app and log in with your extender’s credentials.
Navigate to Reset:
Find the “WiFi Settings” or “Wireless” option in the app.
Look for the “Reset” or “Restore Factory Settings” option.
Confirm Reset:
Follow the prompts to confirm the reset.
Allow the extender to reboot, completing the factory reset process.
Conclusion:
By following these three methods, you can easily reset Netgear WiFi extender and address various connectivity issues. Remember to reconfigure your extender with the appropriate settings after the reset to ensure optimal performance. Whether you prefer a soft reset through the web interface, a hard reset using the reset button, or a factory reset using the Netgear Genie app, these methods offer flexibility based on your preferences and the extender model you are using.
1 note
·
View note
Text
How do I set up the Netgear EX2700 extender?
Using a Netgear EX2700 extender configuration, you can increase the wireless network's current range. You must connect the EX2700 to your router and set it up using the Netgear genie app or the web-based setup page.
The procedure typically entails plugging the extender into an electrical outlet, connecting it to your router with an Ethernet cable, and then finishing the setup by adhering to the on-screen instructions.
Netgear EX2700 manual Setup
Netgear EX2700 extender configuration through manual method, follow these steps:
Connect the extender to a power outlet close to your router.
Connect your computer or mobile device to the extender's network by selecting the SSID (network name) of the extender.
Open a web browser and go to the default IP address of the extender (192.168.1.250 or mywifiext.net).
Enter the default username and password (admin/password) if prompted.
Click on the “New Extender Setup” button.
Enter the password after choosing the network you want to expand.
Hold off until the extender joins the network.
Move the extender to a desired location, away from the router.
Connect your devices to the extender’s network by selecting its SSID.
The Netgear EX2700 manual setup is now complete.
Note: If you encounter any issues during the setup, you can try resetting the extender to its factory settings and then repeating the setup process.
Netgear EX2700 extender Setup through WPS method
For Netgear EX2700 extender configuration using WPS:
Turn on the WiFi range extender on your Netgear EX2700.
Put your WiFi extender close to the router.
Plug your extender into an electrical outlet.
Watch for the Netgear EX2700's Power LED to turn green.
Press the WPS button on the extender.
If you are still facing any problem related to Netgear EX2700 extender configuration, then contact our expert via toll free number or live chat.
Common issues during Netgear EX2700 setup:
Common issues occur during Netgear EX2700 extender configuration
Mywifiext.net is down.
WiFi extender is connected but no internet due to an incorrect mywifiext password
The WiFi extender at mywifiext.local is not connected to the network.
The Netgear genie app will not launch.
I am unable to access www mywifiext net. N300
Problems accessing the IP address 192.168.1.250
Configuration was lost. Problems with CD WiFi connectivity
Even after Netgear N300 EX2700 setup, the Netgear genie smart setup page remains.
Have you forgotten your Netgear extender's default password?
The LED lights on Extender are not stable.
Mywifiext.com does not work.
Netgear EX2700 extender cannot be accessed EX2700 loses internet connectivity
Netgear firmware cannot be updated.
After updating the EX2700, I am unable to access mywifiext.net due to MAC address filtering errors.
WiFi extender EX2700 not connecting to internet due to failed update
Netgear range extender network name not found
The Netgear Extender is not working.
Troubleshooting Steps for Netgear WiFi Extender EX2700 Setup issues:
Here are some troubleshooting steps for the Netgear EX2700 extender configuration:
Check the location: Ensure that the extender is placed within the range of the router and away from any obstructions or electronic devices.
Reset the extender: If the setup process does not work, reset the extender to its factory settings and then repeat the setup process.
Check the connection: Make sure that your computer or mobile device is connected to the extender's network and not the router's network.
Update the firmware: If you are encountering issues with the setup, try updating the firmware of the extender to the latest version.
Disable VPN: If you are using a VPN, try disabling it and then repeat the setup process.
Contact Netgear support: If you are still encountering issues with the setup, reach out to Netgear support for further assistance.
Note: The steps may vary slightly depending on the model of your Netgear WiFi extender.
How to update firmware on Netgear EX2700 extender?
Netgear EX2700 Firmware Update refers to the process of upgrading the software that runs on the device. This update can improve the performance and security of the device, and fix any bugs or compatibility issues. It is recommended to keep the firmware of your device up to date, to ensure the best possible experience. To update the firmware, you can go to the Netgear website and download the latest firmware version for your device, then follow the instructions provided for the firmware update process.
Turn on your Netgear EX2700 WiFi extender first.
Connect a router to the extender.
Once finished, launch the web browser of your choice.
In the address bar, type www mywifiext net N300 and press Enter.
To access your extender, enter the username and password.
Click the Firmware Upgrade option under Settings.
Thereafter, click on the Check button.
If a new firmware version is available, select yes to upgrade the firmware.
Wait a while for the Netgear EX2700 firmware to properly update.
Netgear EX2700 extender reset process
The process to reset the Netgear EX2700 is as follows:
Find the reset button on the device's bottom or back.
Press and hold the reset button for 10 seconds, or until the Power LED on the device starts flashing.
Release the reset button.
Wait for the device to reboot and finish the reset process, which may take a few minutes.
Note: Resetting the device will erase all of its custom settings, including the network name and password, and return it to its factory default settings. Make sure to have this information readily available before resetting the device.
#Netgear EX2700 manual Setup#Netgear EX2700 extender Setup through WPS method#Common issues occur during Netgear EX2700 extender configuration#Troubleshooting Steps for Netgear WiFi Extender EX2700 Setup issues#How to update firmware on Netgear EX2700 extender?#Netgear EX2700 extender reset process
0 notes
Text
How to login netgear wifi extender?
It is easy to modify and customize the settings of your Netgear WiFi extender by logging in.
Make that the extender is within range of your current WiFi network and that it is correctly connected to a power supply before starting.
After the extender has been turned on, link your PC or mobile device to the default network—usually called "NETGEAR_EXT."
Once connected, use a web browser and input 192.168.1.250 or http://mywifiext.net into the address bar.
This will launch the Netgear WiFi extender login page. When logging in for the first time, you'll be asked to either set up an account or configure the extender by providing the login credentials for your router.
If you’ve previously set it up, log in with the credentials you created during the first setup.
It's typically possible to reset the extender if you've forgotten your login information.
To accomplish this, press and hold the reset button for around ten seconds, which will reset the extender to its initial configuration. Resetting it will require you to set it up again.
Once signed in, you may adjust settings like the WiFi network name (SSID), password, or security options, and check the connection status between your router and the extender. You can keep an eye on performance, fix problems, and upgrade firmware for improved security and performance by logging in frequently.
For more details visit our website.
0 notes
Text
Netgear WiFi range extender setup
A Netgear WiFi range extender is a device that can help you extend the reach of your home's WiFi network. If you have areas in your home where your WiFi signal is weak or nonexistent, a range extender can be a great solution.
Here are the steps on how to set up your Netgear WiFi extender via mywifiext:
Connect your extender to a power outlet.
Connect your computer or mobile device to the extender's WiFi network.
The extender's WiFi network will have a name that is similar to your home's WiFi network name, but with an "_EXT" at the end. For example, if your home's WiFi network is called "NETGEAR," the extender's WiFi network might be called "NETGEAR_EXT."
Open a web browser and enter mywifiext.net in the address bar.
Enter the extender's default password in the password field.
The default password is usually printed on a sticker on the extender. If you have lost the sticker, you can reset the extender to factory defaults by holding down the reset button on the extender for 5 seconds.
0 notes
Text
Troubleshooting: Tips for Netgear Extender Not Connecting to Computer
A Netgear WiFi range extender is a useful device that can help expand the reach of your existing wireless network. By connecting to your router wirelessly, an extender grabs the existing WiFi signal and rebroadcasts it further into areas that may have poor or no coverage, like the far corners of your home or out in the backyard.This gives you the ability to get internet access in dead zones that your router may not reach on its own. But even after a successful Netgear WiFi range extender setup, some users find that their Netgear extender won't connect to their computer for some frustrating reason.If you've managed to connect your extender to your main router but it won't connect to your computer, there are some troubleshooting steps you can try to fix the problem. With a bit of tinkering, you can have your extended wireless network up and running smoothly. Being unable to access the internet defeats the purpose of having a range extender in the first place!
Some of the Main Troubleshooting Steps:
Check if the extender and computer are too far apart. Checking Extender's WiFi Network is Visible Using the Correct WiFi Password Restarting Your Computer Updating the Extender's Firmware Disabling Security Temporarily to Test Connection Resetting the Extender to Factory Settings
Conclusion
Having issues getting your Netgear WiFi range extender to connect to your computer can be frustrating. But hopefully, with the troubleshooting tips provided, you now have an action plan to get your devices communicating again.Following this structured troubleshooting approach should help isolate the cause and allow you to systematically fix connection problems between your Netgear extender and computer. Don't hesitate to also contact Netgear support if issues persist after trying these steps.With a properly located and configured Netgear extender, you can start enjoying the benefits of boosted WiFi coverage across your home network. Read the full article
#computer#connectivity#contactsupport#extender#extenders#firmware#netgear#Netgearextender#netgearrangeextender#network#reset#router#SSID#technicalsupport#tips#troubleshooting#wifi#wifihelp#wifisupport#wireless
0 notes
Text
Netgear EX6400 setup
The Netgear EX6400 setup is the process of configuring and installing the Netgear EX6400 WiFi extender, a device designed to enhance and extend the coverage of an existing WiFi network. It is especially helpful in large houses or workplaces where the Wi-Fi signal could not fully cover every area.
Netgear EX6400 setup Using Web browser
Follow these steps for Netgear EX6400 setup through Web browser:
Plug in your Netgear EX6400 extender and wait for the green power LED to shine brightly.
Establish a connection between your device and the extender by utilizing an Ethernet cable.
Launch a web browser on your device.
Enter "mywifiext.net" into the address bar and hit Enter.
Access the system by employing your default login credentials.
Choose the WiFi network you wish to amplify.
Proceed by following the prompts displayed on the screen to finalize the setup.
We hope that by following the steps outlined above, you will be able to configure your Netgear EX6400 WiFi range extender. If you get stuck at any point, please contact our experts.
Netgear EX6400 setup Using WPS Method
Utilizing WPS represents the simplest method for setting up the Netgear EX6400 Extender. You can set up your Netgear EX6400 wifi range extender in just two minutes.
Follow these steps for Netgear EX6400 setup through WPS:
The power source should be connected to the Netgear EX6400 wifi extender.
Wait until the power LED transitions to a solid green light.
Note that the WPS setup for the Netgear EX6400 Wi-Fi extender works best when it's in close proximity to your router.
Begin by pressing the WPS button on the Netgear EX6400, followed by the corresponding button on your router.
This process will create a connection between the extender and your standard Wi-Fi network.
This is the procedure for establishing a connection to your existing internet using the WPS method.
Netgear EX6400 Extender Firmware Update
Firmware is a type of software that controls the internal operations of a device. In the case of a wifi range extender, the firmware controls the way the extender communicates with the router, the way it amplifies the wireless signal, and many other functionalities.
Steps to Update Firmware Of Netgear EX6400 extender :
Power up your Netgear EX6400 extender.
Connect a device to the extender.
Open a web browser and enter "192.168.1.250" in the address bar.
Log in with your username and password.
Navigate to the menu and choose "Firmware Update."
Select "Check Online" to determine if a newer firmware version is available.
If an update is available, click to update.
Your Netgear EX6400 extender's firmware is now up to date.
Common Issues during Netgear EX6400 setup
Mywifiext.com and mywfiext.net are no longer operational.
The WiFi extender is connected to the router, but there is no internet access.
I am unable to access mywifiext.local.
Mywifiext password is incorrect.
The WiFi extender is constantly disconnecting.
The WiFi extender is unable to connect to the network.
I forgot the default Netgear extender password.
Netgear EX6400 cannot be accessed.
The Netgear EX6400 is not operational.
EX6400 cannot be reset.
Troubleshooting Tips for Netgear EX6400 extender configuration
If you're experiencing issues with your extender and it's affecting your Wi-Fi device's performance, follow the troubleshooting steps provided below to quickly resolve the problems and have your EX6400 functioning optimally within minutes.
Verify whether your Netgear EX6400 extender is securely connected and receiving sufficient power.
A high-speed internet connection is required for your device.
Check that all of the wired connections are secure.
Keep your extender away from cordless phones, Bluetooth devices, metal objects, room corners, microwave ovens, and other devices that could interfere with your WiFi signal.
If mywifiext.net is not functioning, ensure that you have accurately entered the correct web address in your browser's address bar.
Check that your Netgear EX6400 is running the most recent firmware version. If not, update your device to the most recent version right away.
If the preceding troubleshooting suggestions prove ineffective, reset your extender to its factory default settings and then proceed with the reconfiguration process.
#Netgear EX6400 setup#Netgear EX6400 setup Using Web browser#Netgear EX6400 setup Using WPS Method#Netgear EX6400 Extender Firmware Update#Common Issues during Netgear EX6400 setup#Troubleshooting Tips for Netgear EX6400 extender configuration
1 note
·
View note
Text
How To Login Netgear Wifi Extender IP Address
If you don't access the Netgear Wifi Extender IP Address then you need to reset quickly. Visit our website for complete simple and easy methods to solve this issue. We provide simple steps that help in login and setup the Netgear Wifi Extender login. Our team is available 24/7 so you can obtain immediate support and solutions. We will provide instant and troubleshooting ways to solve the netgear extender issues.

1 note
·
View note
Text
How to Update Netgear Ex6110 Ac1200 Firmware Version? Netgear Extender Software Update
youtube
___________________________________________Netgear Ex6110 Ac1200 Extender #Firmware Update can be done by logging in to the netgear extender web management page. So, first connect your computer/laptop to netgear ext network name and then type mywifiext.net into the url. In case you cant update netgear extender firmware then follow our step by step guide to complete #ex6110 firmware update.Do Like And Subscribe If The Video Was Useful To Support My Channel!!!Our Official website for Technical help:- https://devicessetup.comDownload Netgear Extender Latest Firmware File From here :- https://downloadcenter.netgear.comNetgear Wifi Extender Setup SCAM :- https://youtu.be/Mr4zMKXhLBcNetgear Ex6110 setup guide :-How to Login Into Wifi Extender Using Its Ip Address:- https://youtu.be/Iszz2Oyna4EHow to reset netgear ex6110 extender :- https://youtu.be/c8i3ryUpyCQHow to setup netgear extender as access point or using ethernet cables :- https://youtu.be/uxce3UpK3uoHow to turn Netgear Extender Leds On or Off? :- https://youtu.be/5LWIo9NlsqM----------------------------**FAIR USE**Copyright Disclaimer under section 107 of the Copyright Act 1976, allowance is made for “fair use” for purposes such as criticism, comment, news reporting, teaching, scholarship, education and research.Fair use is a use permitted by copyright statute that might otherwise be infringing.Non-profit, educational or personal use tips the balance in favor of fair use.--------------------#netgearextenderfirmwareupdate #netgearex6110#ex6110ac1200 #netgearextenderex6110 #netgearexthelp #wifiextender #wifirepeater #diy #technicalhelp #netgear #devicessetup
1 note
·
View note
Text
Netgear Wifi Extender Orange Light : Fix this Issue

The orange light is a common problem with Netgear wifi extenders. Netgear wifi extender orange light is usually caused by the extender not being properly connected to the router. The orange light indicates that the extender is not connected properly and needs to be reset. Moreover, users need to know the specific reasons and causes of the problem. Fast speeds and perfect performance are provided by Netgear extenders. Netgear WiFi extenders display orange lights when the issue occurs.
Reasons For the Netgear WiFi Extender Orange Light
There are various causes for the Netgear wifi extender's orange light. The orange light indicates that the extender is not connected to the main router, meaning it is not receiving a strong enough signal from it. This is caused by the extender being too far away from the router or interference from other electronic devices.
The problem can be resolved by moving the extender closer to the router or turning off or moving the other electronic devices away from it. This will allow the extender to receive a stronger signal from the main router and connect properly. Let us check its primary causes.
Power supply malfunctions.
It appears that the Ethernet cable is experiencing an issue.
Adding firmware to Netgear devices with outdated firmware.
Multiple technical glitches.
There is a possibility of interference with the signal.
Your Netgear extender setup was incorrect.
Wi-Fi device placement has a problem.
It becomes easier for you to solve the Netgear wifi extender orange light issue.
Best Methods To Fix Netgear WiFi Extender Orange Light
You can use the most effective ways to solve the Netgear wifi extender orange light problem. Check out the best methods to fix the issue here.
Reboot Your Netgear Extender
The first step is to restart your Netgear wireless range extender. The orange light problem might be fixed by rebooting your device. Avoid other troubleshooting tips to save time.
It is necessary to turn off your Netgear range extender.
It is now possible to unplug it from the wall outlet.
A few seconds are all you need to wait.
It will power up once you reconnect it to the outlet.
Now you can check whether the Netgear wifi extender orange light problem is solved or not.
Update Netgear Extender Firmware
It is always necessary to update the firmware on Netgear. Resolving the orange light issue on your Netgear range extender can be done by updating the firmware. These are the steps that users can follow:
A web browser is installed on your device, so it must be updated.
This page provides instructions for setting up a Netgear extender.
To update the firmware, go to Settings > Maintenance and choose Firmware Update.
Updates to the firmware are now available.
Tap here to access it.
Several minutes are required for the firmware update.
After updating the Netgear Wi-Fi extender firmware, it's critical to verify whether the Netgear Wi-Fi extender's orange light is fixed or not.
Check the Ethernet Connection
The Netgear extender must be connected to the router. It is not necessary to replace or tighten the cables that connect your devices. Your time won't be wasted if your Ethernet cable is damaged. We need to replace it as soon as possible. By replacing the cable, you can check if the orange light on your Netgear wifi extender is gone.
Check Power Supply
It is not uncommon for Netgear extenders to have damaged or faulty power outlets. It is important to check power outlets. A wall socket can also be replaced to provide power to the extender. This is because faulty power outlets can damage the extender by not providing the necessary power for it to run properly. Replacing the wall socket is a good way to ensure that the extender is getting the power it needs to function properly.
Reset Your Netgear Extender
Performing a factory default reset on your Netgear WiFi extender will resolve the orange light issue if you have tried all the troubleshooting tips mentioned above. Several steps need to be followed for this process to be successful. As well as removing all extension settings, it allows you to reset them.
It is most effective to reset the extender to its original settings and restore its functionality by performing a factory default reset. This will help you identify and resolve any software-related issues causing the orange light issue. It gives you a fresh start to troubleshoot any hardware-related issues.
The Netgear extender's reset button needs to be found first.
If the button needs to be reset, use a safety pin. To reset the machine, locate the reset button and press it firmly with the safety pin.
Upon completing the reset process, wait a few minutes. You can wait a few minutes after completing the reset process for the changes to take full effect.
After this, you can set up your extender again and use them perfectly.
Final Words
You can use the above methods to solve the Netgear wifi extender orange light. It is imperative to read and follow all the steps carefully so you quickly fix the problem.
0 notes
Text
Netgear EX3920 Setup
You can increase the range and speed of your current network by adding dual-band WiFi with the Netgear EX3920 Setup. It functions as both a range extender and an access point. With its dual-band range, Netgear AC750 EX3920 can reach up to 100–120 feet away.
How do I configure my Netgear EX3920?
For the Netgear EX3920 setup, the following procedures must be followed:
For your home WiFi, position the EX3920 AC750 Extender next to the router.
Connect the extender to the power outlet.
Wait for the power light on your Netgear EX3920 to first turn amber and then solid green.
If the power LED is not glowing, press the power on/off button.
You must connect your wireless device to the Netgear_ext network after turning on your extender.
Once you've established a network connection with the Extender, go to www.mywifiext.net.
To install your Netgear EX3920, follow the directions on the screen.
Netgear EX3920 Setup Using a WPS Button
Steps for Setting up a Netgear EX3920 extender with WPS:
The Netgear AC750 EX3920 extender must be turned on.
Install the WiFi extension and router in the same location.
Connect your extension to a power outlet once you're done.
Watch for the EX3920's Power LED to become green.
The extender's WPS button should be pressed.
If the Netgear EX3920 Link Status LED is lit in white, your extender and router are connected properly.
Your extender should be relocated.
Bring a laptop or other mobile Internet-capable device if you're travelling somewhere with patchy WiFi router service.
With a computer or mobile device that supports WiFi, join the enlarged network.
If you still have any issue regarding Netgear EX3920 Setup, then don’t feel ashamed to contact our experts via live chat or toll free helpline number.
Problems with the Netgear AC750 EX3920 setup
Not working is Mywifiext.net
WiFi extender connects but no internet due to incorrect mywifiext password
WiFi extender cannot access mywifiext.local because it is not connected to the network.
The Netgear Genie app won't launch.
Accessing 192.168.1.250 IP address has problems
CD WiFi connectivity difficulties have been resolved
The LED lights on the extender are unstable.
Mywifiext.com won't launch
Netgear EX3920 extender loses internet access and won't let you log in
updating Netgear firmware is not possible
After a fix for the EX3920 MAC address filtering problems, mywifiext.net is no longer accessible.
WiFi extender EX3920 not working after failed update and not connecting to the internet
No network name for Netgear range extenders
Extender from Netgear not working
No internet on Netgear EX3920
Inability to restart the Netgear extender's Internet connection due to issues with the red light on the device
Troubleshooting tips for Netgear EX3920 Setup Problems
Use the troubleshooting instructions listed below to resolve setup issues with the Netgear WiFi extender EX3920:
Check to see that the Netgear AC750 EX3920 extender is getting the right amount of power from the wall outlet.
When plugging in the extender, make sure the wall plug is not damaged or shorted.
Get your device a high-speed internet connection.
Verify each and every electrical connection. Use only undamaged cables.
Place your extension away from things like cordless phones, microwaves, fish tanks, room corners, metal objects, walls, and aluminium studs. Also, keep your extension away from metal objects, walls, and walls.
Check to see if you have the right URL entered in the address area if you are experiencing problems with mywifiext.net.
After doing a power cycle, try configuring your Netgear extender once more.
Only the most recent version of your web browser should be used to access mywifiext.net.
Update the firmware on your extender to the latest Netgear version.
Reset the extender's settings to their original factory defaults.
How can I reset my NETGEAR Ex3920 to factory settings?
You can reset the default settings on your EX3920 using one of two methods. both via the online user interface and by initially choosing the Factory Reset option (GUI).
The hard reset:
Locate anything, such as a pen or a paper clip.
On the extender bottom find the factory reset button.
Hold down the reset button with a paperclip or pen for at least five seconds, or until the Device to Extender LED starts to flicker amber, before releasing the button.
After the extender has restarted, release the Factory Reset button.
After rebooting your factory settings have been restored.
Reset Using Web GUI:
Use a Computer that is either wirelessly or wired connected to the extender.
Open a web browser like Google Chrome, Mozilla Firefox, or Internet Explorer.
In the address bar of your web browser enter www.mywifiext.net.
To log in, go to the login page, input your email address, and then click Log In.
On the NETGEAR genie page, choose Settings, followed by Extra Settings.
Press Reset. Tap Yes to proceed.
Wait for the web interface to finish restoring the device to its factory default settings.
If you still have any issue regarding Netgear EX3920 Setup, then don’t feel ashamed to contact our experts via live chat or toll free helpline number.
1 note
·
View note
Text
Netgear New Extender Setup
We provide technical assistance for all Netgear New Extender Setup WiFi related issues throughout the world for 24x7. Whether it is small or large enterprise. Netgear New Extender Setup Support whose prime aim is to work towards customer satisfaction.
We believe delivering world class services driven by perfection and experience. We offer anywhere, anytime technical support for repair, diagnosis, installation etc. Our technicians are highly trained and certified. Netgear New Extender Setup provides the best online WiFi Extender Support with 99.99% customer satisfaction. Our service level agreements provide
99.99% uptime and 90% of calls are answered in 10 seconds or less. Call us and get 100% Satisfactory and permanent resolution. You can find better information about us from our website.
Or feel free to call us any time on our Toll Free Number: 1-213-283-0893. Our services will work like magic. But this is not magic exactly, but it is the unique strategy we use to solve the issue.
#netgear new extender setup#new extender setup#netgear wifi extender setup#netgear n300 setup#netgear ac1200 setup#netgear ac750 setup#netgear extender resetup#reset netgear extender#netgear ex6200 setup#netgear ex7000 setup#netgear ex7300 setup#mywifiext#mywifiext net setup#mywifiext.net#mywifiext.net setup
1 note
·
View note
Text
Troubleshooting Guide 2024: Mywifiext Not Working — Resolving Common Issues

Check the Basics: Before delving into complex troubleshooting, ensure the basics are in order.
Confirm that your WiFi extender is powered on.
Verify that the extender is within the range of your existing WiFi network.
Make sure you’re using the correct web address for the Mywifiext setup.
Browser Compatibility: Mywifiext is optimized for certain browsers. Incompatibility issues might arise if you’re using an outdated or unsupported browser. Try accessing the setup page using different browsers like Chrome, Firefox, or Edge.
Clear Browser Cache: Cached data can interfere with the loading of web pages. Clear your browser cache and try accessing Mywifiext again.

Connectivity Issues:
Ensure a stable and active internet connection. If possible, connect your computer directly to the extender with an Ethernet cable to rule out WiFi issues.
Reboot your modem, router, and extender to refresh the network.
Firewall and Antivirus Settings: Security software may sometimes block access to Mywifiext. Temporarily disable your firewall and antivirus programs and attempt to access the setup page. Remember to re-enable them after troubleshooting.
Firmware Updates: Ensure that your extender’s firmware is up to date. Check the Netgear support website for the latest firmware version and update if necessary.
Factory Reset: If all else fails, consider performing a factory reset on your WiFi extender. This will revert the settings to default, and you can start the setup process anew.
Contact Support: If the issue persists, it might be time to seek professional help. Contact Our support (+1855–201–8071) for assistance. Be prepared to provide detailed information about your setup, including the extender model and any error messages you encountered.
Conclusion: The “Mywifiext not working” issue can be caused by various factors, ranging from simple configuration errors to more complex network issues. By systematically troubleshooting each potential problem, you increase your chances of resolving the issue and enjoying a seamless WiFi extender experience. Remember to document any changes you make during troubleshooting for future reference.
#Mywifiext Not Working#mywifiext net not working#www mywifiext net refused to connect#mywifiext net is not working
0 notes
Link
In this article, we will discuss about Netgear EX6100 AC750 extender setup. Netgear Ex6100 helps to create a network mesh using your existing Wi-Fi network and also extends the range to dead zones. Netgear AC750 Wi-Fi Extender supply rapid speed to Wi-Fi and connectivity for devices like smartphones, tablets, laptops etc. Netgear EX6100 AC750 extender Setup also creates an effortless network range all-around your home using the same Wi-Fi network name (SSID) as your existing router or internet provider gateway.
EX6100 AC750 Dual band extender setup via WPS
WPS to connect the extender to your Wi-Fi router:
Firstly push the WPS button which is on the side panel of the extender, you will see WPS LED blinks.
Further meanwhile at the same time, push the WPS button on your router also. Now you will see if the extender is connected to your existing router successfully then the WPS LED on the extender turns solid green and Router link LED lights. If you see the Router Link LED does not lights, must try again.
Remember if the Wi-Fi router keeps up the 5 GHz band and then repeat Steps 1 and 2 to connect the extender to the 5 GHz band.
Now unplug your extender and relocate it to a new place, we recommend placing mid-way between the router and the area where you find the Wi-Fi signal to be extended.
Then plug the extender into a wall socket and wait till the Power LED turns light green.
#netgear ex7300 access point setup#netgear ex7300 setup manual#netgear model ex7300 manual#netgear wifi extender setup#netgear ex7300 reset#Mywifiext.net
0 notes
Link
A wifi extender is a device that works as a middleman or bridge between a Wi-Fi router and a Wi-Fi device that is beyond of the router's signal range. A Wi-Fi extender is a device that connects to an existing Wi-Fi network and serves as a wireless access point for other Wi-Fi devices. You must reset your Wi-Fi extender if Wifi extender not working is unable to connect to the Wi-Fi router. Depending on the brand, the reset button in the extender may be located in a different location. The reset button will be located on the back of your extension; use a needle to press it for 10 seconds. This will clear all consists of an interconnected group and allow you to customise your extender as desired.
#troubleshooting guide#WiFi Extender Not Working#WiFi Extender Not#wifi extender#netgear nighthawk raxe300 tri-band wifi 6e router price usd 399 specifications netgear nighthawk raxe300 tri band wi fi 6e#Mywifiext#mywifiext setup#wifi not working#wifi#reset modem wifi indihome#cara reset wifi first media#wifi router#wifi 6e#Dlink extender login#linksys extender setup#netgear extender setup#range extender#Extender
1 note
·
View note
Text
Netgear ac1750 Wifi Mesh Extender Setup
Netgear AC1750 (EX6250) dual-band WiFi mesh extender is powerful mesh WiFi for superior internet speed and coverage. Basically by two methods WPS and Manual used for wifi Netgear Ac1750 mesh extender setup. Follow the instructions given below to know how to set up the Netgear extender manually and WPS.
#netgear ac1750 setup#netgear ac1750 manual#netgear ac1750 wifi mesh extender reset#netgear ac1750 wifi mesh extender range#netgear ac1750 wifi mesh extender setup
0 notes
Text
WN3500rp Netgear Wifi Extender Setup
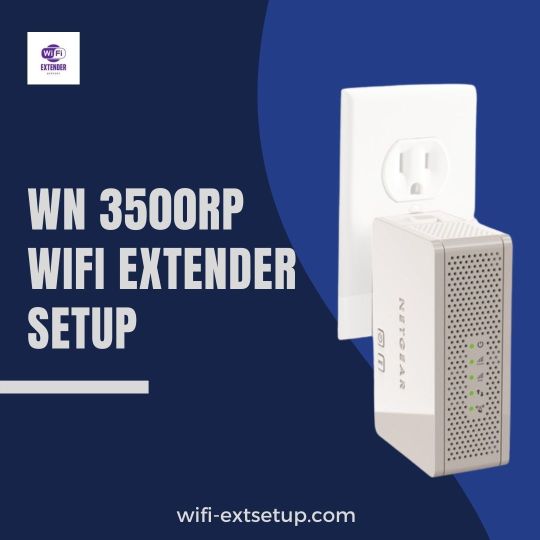
Netgear WN3500Rp N600 is a powerful wifi extender which not only expands your dual-band WiFi but also allows you to connect speakers using Airplay or DLNA. Netgear Wifi Extender WN3500 Setup is a very easy process to perform. You just need to focus on some points and follow. We have provided you with all the important points and steps that are necessary to follow. We are very sure that you will be able to perform netgear wifi extender WN3500 setup once you have gone through the blog post.
#netgear wn3500rp firmware update#netgear wn3500rp setup help#netgear wifi extender setup#netgear wn3500rp manual setup#netgear wn3500rp factory reset
0 notes